
Children are always learning from the world around them. When studying mathematics and science can be connected to their everyday surroundings, children more readily engage in these activities. Right now, as we brace for this very cold winter, snow and ice surround my young children. Why not study geometry, fractions, symmetry and division using a snowflake?

Have you ever wondered how snowflakes are made? I don’t mean how rain changes to snow in freezing temperatures – that’s actually sleet. I mean how are those intricate details of an individual snowflake, or snow crystal, are formed? It’s all about water vapor, freezing temperatures, and geometry.

Count the hexagons! Macro photo of a snow crystal by Alexey Kljatov.
A snow crystal appears when water vapor in the air changes directly into ice (rather than first forming liquid water droplets). It begins with the formation of a tiny hexagonal plate, the starting point of every snow crystal. As the crystal grows, tiny branches sprout from the six corners of the plate, extending outward in a hexagonal array. While all snowflakes follow a hexagonal design, the structure of a snowflake is influenced by the various temperature and moisture levels around it as it forms. Every snowflake is slightly different, but each one will have a repeated hexagon design, visible in its characteristic six points.
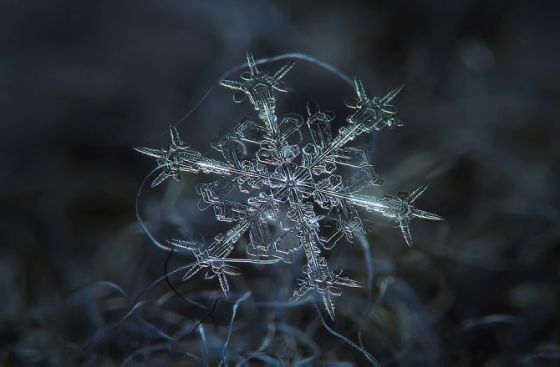
A hexagonal center with ice crystal branches extending from each corner. Macro photo of a snow crystal by Alexey Kljatov.
To see this snow crystal structure up close check out these stunning photos or check out the book The Secret Life of a Snowflake. This kid-friendly reference book explores the art and science of snowflakes and snow crystal formation. Amazing photographs, clear graphics and concise text, make the science of snow fun and accessible. If you and your young students would like to learn even more about the science behind snow crystal formation you can also go to snowcrystals.com.
To focus on the math and geometry of a snow crystal, let’s switch to a few hands-on activities and retrace the design of a snowflake, or snow crystal, by recreating this hexagonal shape and a six-point array. These activities are a fun way to introduce and practice using a compass and protractor, as we construct and “draft” snowflakes. The Westcott 10 Piece Math Set is a real bargain at just $4 (through Amazon or $5 at Target) and includes a protractor, compass, ruler, triangles, and more. The tools were on the small side (fine for kids!), but much higher quality than typically sold at this price point. We used this set for both projects.

Snow Crystal Geometry Activity #1: Degrees of Division
Math Skills Practiced (best for ages 6 and up with some guidance):
- Learning how to measure angles using a protractor
- Dividing a circle into six equal parts
- Creating a hexagonal array and a symmetrical pattern
Supplies:
- protractor
- plain white, colored, metallic, origami, or coffee filters or color diffusing paper
- pencil
- scissors
Optional Supplies (if using coffee filters or color diffusing paper):
- liquid watercolors (if using color diffusing paper)
- droppers or small paint brushes (if using color diffusing paper)

Instructions:
- Using a large lid or saucer as a template, trace a circle on paper of your choice.
- Cut out the circle.
- To “divide” into two equal halves, fold the circle in half.
- Measure and mark the center of the flat edge of the half circle.
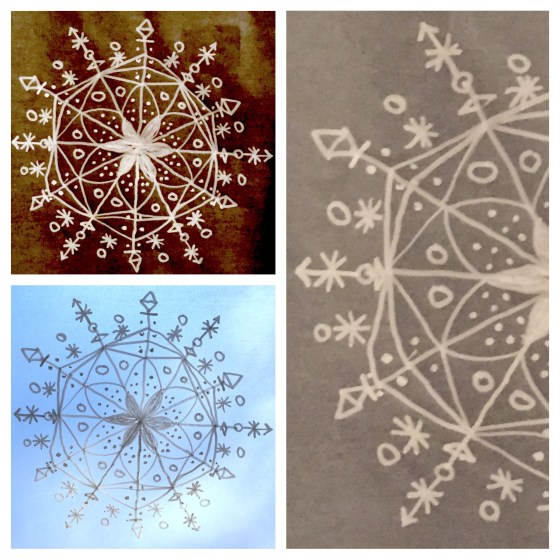
- Place the protractor on top of the folded paper, aligning the center of the base of the protractor with the center mark on the paper (as shown above). Following the measurements along the top of the protractor, make a pencil mark at the 60 degree mark, 120 degree mark, and at the center of the base of the protractor.
- Carefully fold the paper into thirds as shown, with folds aligning with the pencil marks. The circle is now divided into six equal parts and the folded paper shape represents 1/6th of the original circle.
- Fold in half again, dividing the circle into twelve equal parts. The folded paper shape now represents 1/12th of the original circle which will allow for creating six symmetrical snowflake “branches.”
- Holding firmly, cut designs and patterns into the edges of the folded shape, being careful not to cut all the way through the paper.
- Unfold.
- You’ve created a symmetrical hexagonal snowflake!
- Optional: Water Color “Branching” with (coffee filters or color diffusing paper only)
- Place color diffusing paper snowflake on a rimmed tray.
- Using cool colors and droppers, delicately drop watercolor pigment starting at the center of the snowflake and watch the color bleed and flow outward similar to how ice crystals branch outward in true snow crystal formation. See how the valleys and peaks of the paper folds alter the flow of the pigment. Create patterns of symmetry with small droplets on each “branch” of the snowflake.
- Let dry completely.

Snow Crystal Geometry Activity #2: Dividing Equally with Circles
Math Skills Practiced:
- Learning how to draw circles using a compass
- Dividing a circle into six equal parts
- Creating a hexagonal array and a symmetrical pattern
*This activity is best suited for ages 10 and up with some guidance, as using a compass requires some advanced fine motor skills and coordination. For younger children ages 4 and up, you can create a circle template first or simply print out this Snow Crystal Template. Likewise if your child (or you) can easily draw a circle with the compass, but are struggling to draft the complete template or frustration is taking away from the enjoyment of the activity, just focus on experimenting and practice drawing with the compass. Then, print out the completed Snow Crystal Template, complete with rough pencil lines and eraser marks to use as your own, and skip directly to Part 2 and design your snowflake with lines, arcs and patterns.
Supplies:
- compass – This is a tricky tool for young (and often older) children to maneuver and I’ve found that the plastic compass often marketed specifically for elementary age children usually is more frustrating to deal with than it is worth. Spend the extra $3-4 for a metal one like this one, or better yet, as mentioned above the Westcott 10 Piece Math Set is a real bargain at just $4 and includes a protractor, compass, ruler, triangles, and more. (We used this set for both projects.)
- paper
- pencil
- ruler or straight edge
- trace paper
- metallic or white paint pen

Instructions, Part 1 – Making the Template:
- Use compass to draw a circle at the center of the paper. Place the compass point at the center of the paper and carefully rotate, dragging the pencil tip completely around the point to create a circle.
- As shown above, keeping the compass at the same radius setting, align the point so that it is on the edge of the original circle. Draw a second circle. This will intersect the original circle twice as well as pass through its center point.
- Next, align the compass point on one of the intersections of the first and second circle as shown above. Draw a third circle.
- Repeat, aligning the compass point on the intersections of the original circle and the next circle until you have made it all the way around the original center circle.
- Draw a line from the center of the original circle to each of these intersection and about 1/2″-1″ beyond.
- You have now divided the circle into six even segments! You can continue to divide radially until the circle is divided into 12 equal fractions as shown above.
Instructions, Part 2 – Using the Template:
- Use the template created in Part 1 or the free printable Snow Crystal Template, by overlaying a sheet of trace paper and securing in place with a bit of tape at the corners.
- Trace the basic radial symmetry in metallic or white paint pen adding freehand details as you go. (See bottom center image above.)
- Create individually or as a “team” by making sure each artist goes all the way around the snow flake with their individual detail (repeating 6-12 times). With my younger child, we had fun “taking turns” and alternating adding a pattern, line or shape all the way around the snowflake. This “game” approach encouraged creativity while prompting practice in counting, symmetry and pattern making.
- Remove from template and hang in a window or overlay on dark construction paper to “reveal” the snowflake patterns. If hanging in a window, little ones can watch the striking changes in contrast as lighting changes throughout the day.
Looking for more snow and snowflake-inspired activities that include more complex math and science topics? The images below display snow-themed activities incorporating elementary through middle school STEAM concepts. Links to posts below!
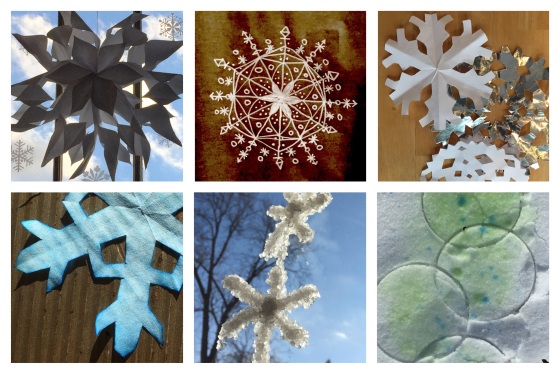
For more winter-themed art activities above that include math, science and engineering concepts go to the following links:
- Do You Want To Build a Snowflake (top left)
- Snow Crystal Geometry (top center, top right + bottom left – this post!)
- Growing Snow Crystals (bottom center)
- A Blank Canvas of Snow (bottom right)
Interested in snowman-themed projects for artists of all ages? The snowman images below are shown in order of complexity starting with toddler/preschool activities and progressing through elementary/middle school STEAM concepts. Links to posts below!
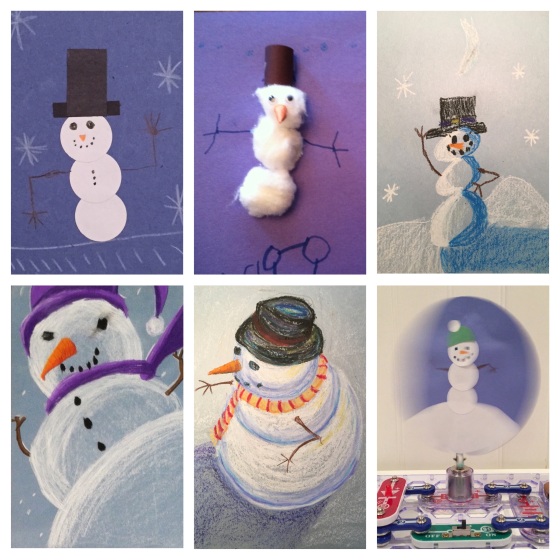
To further explore art, math and science concepts through snowman-inspired activities, go to the following links:
- Stacking Snowman Shapes (top + center left)
- Simple Snowmen (top right)
- Snowmen Perspectives (bottom left + center)
- Thaumatrope Snow Globes (bottom right)

The snowflakes are lovely. An interesting extension for older students might be to find the area of the snowflake. This would be a really challenging area of complex shapes problem.
Thank you! Great idea!
Pingback: Growing Snow Crystals | Design in Play
Pingback: Do You Want to Build a Snowflake? | Design in Play
Pingback: A Blank Canvas of Snow | Design in Play
Pingback: Math for Small Children and Others – MTBosBlogsplosion Week 3 | Math.Easy.As.Pi
Pingback: Watercolor Leaves – Observation, Line Drawing and Color Mixing | Design in Play
Pingback: Color Mixing and Marbled Eggs | Design in Play
Pingback: Do You Want to Draw a (Perspective) Snowman? | Design in Play
Pingback: Simple Snowmen (with Shading & Highlights!) | Design in Play
Pingback: Thaumatrope Snow Globes | Design in Play
Pingback: Montessori-Inspired & Holiday-Themed Learning Trays | Design in Play
Pingback: Holiday Math Puzzles and Activities for Christmas, Winter Break – Denise Gaskins' Let's Play Math