
Inspired by “shaving cream marble prints” that have become so popular and the color mixing experiments that fascinate my kids, we opted to try “marbelizing eggs” this year with a similar process. Not wanting to expose our food (with it’s highly permeable shell) to shaving cream, however, we chose whipped topping for its similar consistancy but less toxic ingredients.
This is a simple creative activity for kids that keeps all the “mess” within one large easy-to-rinse baking dish.
Supplies:
(1) large container of whipped cream or whipped topping (we used Cool Whip)
(2) liquid or gel food coloring
(1) vinegar
Hard boiled eggs
Large rimmed cookie sheet or baking dish (at least 1-2″ high rim to contain the whipped topping)
Directions:
- Place hard boiled eggs in a large bowl and cover with vinegar. Let eggs soak fully immersed in the vinegar for about 2 minutes. Remove from vinegar and pat dry. Do not rinse.
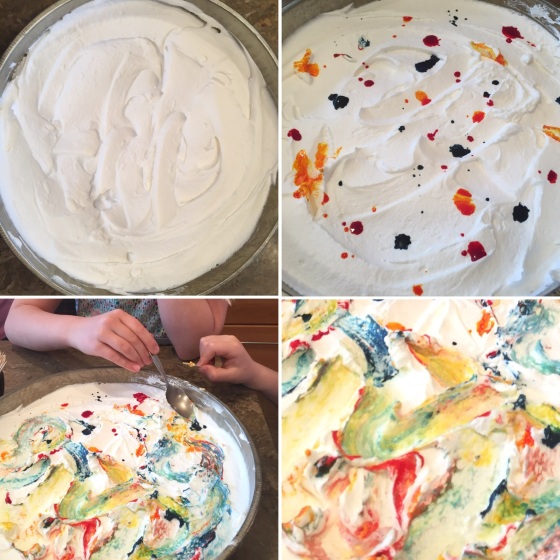
- Spread the whipped cream or whipped topping evenly across bottom of baking dish to create a blank white “canvas.” Be sure to go all the way to the rimmed edges, at least 1/2″ – 1″ thick.
- Prepare food coloring. To make the colors more vibrant and stick to the egg shell, add a few drops of vinegar to the food coloring. You can either mix a teaspoon of dye with a few drops of vinegar in a smaill measuring cup or measuring spoon to disrepute directly on the whipped topping. Or, for more controlled and easy application for little artists, mix colors and vinegar in a small dish or cup, and fill a pippette or dropper to apply the drops of color to the whipped topping.
- Add droplets of food coloring and vinegar mixture. We just used primary colors – red, blue, and yellow – so we could mix various combinations of secondary colors – orange, purple and green- in swirls across our “canvas. Be generous with the colors, but leave 1″-2” between individual drops for creating swirls.
- Using a spoon, spread and swirl the colors around the canvas. Do not over mix, keep a balance of swirled colors and white.
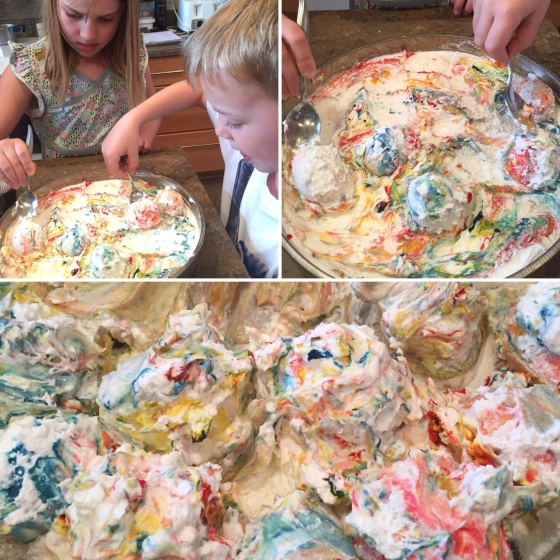
- Place one egg at a time in the dish and gently roll across the “canvas” to pick up the colorful swirls on the shell. One complete roll allows for full color contact without making the colors muddy.
- After rolling each egg, let it sit in the dish so colors can fully soak in. We strategically rolled ours so paths didn’t overlap (too much) and eggs could remain along the edges of the dish as we continued to roll new ones through the mixture.
- Let the eggs sit for at least 15 minutes to let the color swirls soak in. The longer you let them sit the brighter your dye will be. (However, for food safety limit the time you keep the eggs out of the refrigerator and in the whipped topping mix to 30 minutes.)
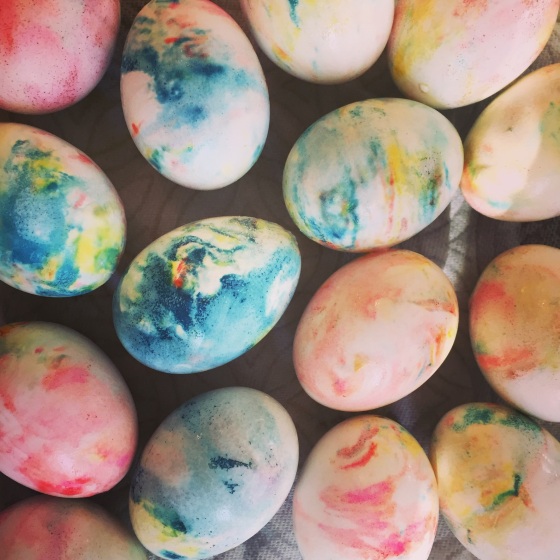
- Quickly rinse each egg under cold water to remove the whipped topping. Keep water cold and rinse them quickly to keep colors for fading an washing off too!
- Place eggs on a paper towel or wire rack to air dry.
For more fun with mixing colors see Watercolor Leaves, Snow Crystal Geometry, A Blank Canvas of Snow, and Beyond Coloring.

These look lovely 😂
Thank you! They were so fun and easy to do!
Thank you!
Ooo this is so pretty! We’re doing wooden eggs this year, wonder if this would work for them too? Have to try it!
Thank you! For wooden eggs, you could use shaving cream for the “canvas” base and add drops of concentrated liquid water color pigments or use the food dye as above. Wood is porous, much like the egg shell, so I would think it will absorb the color nicely.
Pingback: Beyond Coloring | Design in Play