
In February, it seems that so many creative projects for kids gravitate toward making Valentines or painting simple heart shapes. We decided to go a step further in our Valentine crafting and explore positive and negative space while creating simple heart shapes.
What is Positive and Negative Space?
In a work of art, positive space is best defined as the subjects or areas of interest. The negative space is the area surrounding subjects, or areas of interest. The balance of negative and positive space can change the viewer’s perception of the subject.
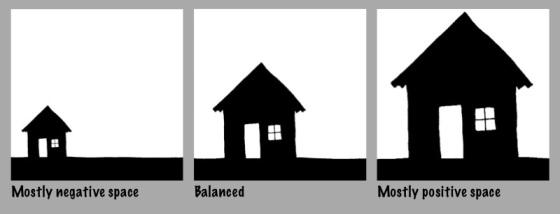
The relationship between positive and negative space impacts the composition of an art piece. This balance can also create many interesting “figure/ground” optical illusions as our perception what is the subject or figure and what is the background becomes skewed. Look at the image below. What is the positive space (or subject) and what is the negative space (or background?)

A Figure/Ground illusion: Do you see a vase or two faces? (Image from Wikipedia)
To explore the idea of negative space with very young artists, this simple painting method develops fine motor skills while offering practice in color mixing and counting. The project also ends with a surprise for little ones when finally viewing the negative space as the subject of the art piece itself, similar to the figure/ground optical illusion. (If your little artist isn’t interested in painting hearts, use any shape for a template to make interesting positive/negative art pieces.)
Negative Space Hearts
Supplies:
- Heart-shaped template such as these heart-themed playing cards, or thin cardboard, such as a cereal box works well
- White card stock or sturdy paper
- Tempera or acrylic paint
- Paper plate
- Cotton Swabs
- Heart-shaped template such as these heart-themed playing cards, or thin cardboard, such as a cereal box works well
- Masking tape or scotch tape
- White card stock or sturdy paper

Instructions:
- Create a heart-shaped (or any simple shape!) template using the thin cardboard or card stock. For our project, we used heart-shaped playing cards from the dollar store. The size and shape were perfect proportions for the scale of our artwork and the thick, glossy paper was ideal for a template when using paint.
- Set up/mix paint using paper plate as a palate and cotton swabs as paint brushes.
- If creating a card, fold card stock in half.
- To keep surfaces tidy, as this can get a little messy for little ones, place card stock on paper or disposable tablecloth to protect table surface.
- Make a loop of tape and attach to back of template. Place template (or templates if making multiple hearts) on card stock and gently push into place so that it stays on the paper during the project, but doesn’t stick so securely that it rips the surface when removed.
- Dip end of cotton swab in paint and dab all over paper to make dots. Cover as much of paper as you like, but concentrate dots along edge and area surrounding template.
- When complete, carefully remove template. Ta-da! The negative space heart is revealed.
- Let dry completely.

For more Valentine-themed art (with a bit of science and math) check out Celery Print Flowers and use the spiral growth pattern of the celery plant to paint roses and see how to create (and duplicate!) unique one-of-a-kind cards with Simple Shapes & Custom Cards.

These are such creative projects!
Thank you so much!
Pingback: Simple Shapes & Custom Cards | Design in Play
Pingback: Beyond Coloring | Design in Play